| |
This is a tutorial on how to sculpt a featureless head from a cube
with a minimum number of steps while attaining a model of a high
level of detail. Some of the steps may not seem to have
immediate purpose, but they're there in anticipation of later steps.
This tutorial is meant to walk you through the construction of a generic
head that will serve as template for you to build upon. Almost
each step is illustrated in the graphic on the right.
- use the box tool (X) to make a cube.
- use subdivide polygons with metaform
- select which side you'd want as your profile
- select a group of polygons as the lower part of the face.
- make sure that polygons are selected thru to the other side.
- under multiply tab, select smooth (shift-f)
in Lightwave 5.6, change the offset value to zero, hit ok
in Lightwave 6.5, click right mouse button without dragging
- use the move tool (t) to pull out a a jaw on the head
- repeat steps 6 and 7 two more times
- unselect polygons
- using the drag points tool (control-T) move the points around on
the profile so the polygons flow around the face in curving arcs.
- select top half of head, smooth shift it and move it up
- repeat step 11
- unselect polygons
- select rear of head, smooth shift it, and move it further back
- using the drag points tool (control-T) move the points around on
the profile so the polygons flow around the face in curving arcs.
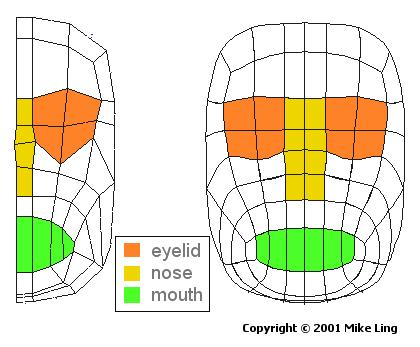
- go to the front of the head, and select the polygons on the half
of the head (left or right) you want to work on.
- use smooth shift and move to create a strip of polygons to about
half as wide as the half of the head selected.
- then using the stretch tool to squash the selected part of
the head to be the width of the strip of polygons you had created in
the last step. then unselect polygons.
- select the half of the head again and smooth shift out again
leaving a thin strip of polygons in the middle. This will be where
the head will be mirrored and where the nose will be.
- select the un-used side of the head and delete the polygons (del)
- select and hide the polygons in the rear of the head so you can
see an uncluttered view of the front of the head. Then using the
drag points tool (control-T) move the points around on the profile
so the polygons flow around the face in curving arcs.
Copyright © 2001 Mike Ling
Next part: the Eyelids
|
|

Tools used in this tutorial
- merge points
- merge polygons
- metaform
- mirror tool
- set value
- smooth shift
- stretch
- subdivide polygon
- triple
|